Wednesday, August 27, 2014

Chocolate Chip Mini Muffins

Hey Y'all!! Hope you are having a great week so far! Around my house it's starting to look a lot like FALL! It may not feel like it outside, but I don't care. I figure I have about two months to have fall decor up and two (short) months for Christmas decorations. That's really only a third of the year...meaning Husband doesn't have to "put up" with my decorations for two whole thirds of the year. At least that's how I break it down to him. 

Usually by the end of the conversation he's so confused he just gives up the fight and let's me do what I want...which means everything is going according to plan!

*insert fingertip tapping and maniacal laughter here*

So completely unrelated to fall and totally related to keeping my Hub happy...It was requested by my love the other day to make something sweet. 

That is an odd request from him because he usually doesn't like sweet stuff. Shocking, I know. So I figured I'd make these adorable little muffins he has loved in the past and I've made several times.

Since he loves them so much I decided to share them with you too!! Hope you like these Chocolate Chip Mini Muffins!

The thing I love about these muffins is they are so incredibly moist. Even after a couple days of sitting on the counter in some Tupperware I can pop one in and they are almost as fresh as the day I made them.

Another thing I love about these little guys are their little chips. The mini chips make it so you get a huge amount of chocolate in every bite.
And yet another thing I love about these mini babies is the sweet crunchy sugary topping. They add a little extra texture and kick the sweetness up just a notch. Perfect!
Ingredients:
2 Cups flour
1 Cup sugar
1 Cup mini semi-sweet chocolate chips
1 Tbsp baking powder
1/2 tsp salt
1 Cup milk
1/2 Cup vegetable oil
1 egg

3 Tbsp sugar
2 Tbsp brown sugar

Directions:
Heat oven to 400 degrees. Grease a 12 cup mini muffin pan and set aside.

In a medium bowl combine the flour, sugar, mini chips, baking powder and salt.

In another bowl mix together the milk, oil and egg until fully combined.

Add the wet ingredients into the dry and stir until just combined. The batter will still be a little lumpy. 

In a small bowl combine the sugar and brown sugar.

Fill the cups up with batter. Using a spoon, top with the sugar/brown sugar mix.

Bake for 15-18 minutes, depending on how well you like your muffins done. If you like em super moist, shorten the cooking time. If you like them with a little crunch and kind of dark on top, cook for the whole time.

Allow to cool on a baking sheet, pop em out, and devour! This recipe made about 36.

So are you ready for Fall or are you like all my aunts and say "Do you not remember last Winter?!"? Yes I remember last Winter. It was terrible and lasted forever. I don't want Winter...I want Fall! I want all things pumpkin and apple spice. I want bright orange, red and yellow leaves. I want fluffy sweaters and cute boots! I want all things FALL! Bring it!

Thanks for stopping by!

**I linked up to create it thursday, full plate, thursday style, weekend potluck, creativity unleashed, weekend bloggy reading, best of the weekend

Monday, August 25, 2014

Chocolate Energy Bites

Hey Y'all and Happy Monday to ya! Hope you had an amazing weekend! These past couple days I got to spend so much time with my Hub, and it was wonderful. Nothing beats laying on the couch with your sweetie doing...well nothing! 

I guess we didn't do nothing. Friday night we went to a special church service and got to spend some quality time with the Big Guy upstairs. It was nice. Saturday and Sunday were full of couch sitting and cooking. Hub was doing the couch sitting, I was doing the cooking :) Sunday was also my wonderful father-in-laws 71st birthday. He doesn't look a day over 60, and he doesn't act a day over 30! I love him so much and am so lucky to have such a great FIL who I know will one day be a terrific grandpa! 

So as some of you may know I am a Zumba instructor. It is seriously the best job in the world! Many people laugh when they find this out because they know what a baking fool I am. But I simply tell them I Zumba because I eat, not the other way around. I love food too much to cut back due to my weight. So I workout 7 days a week and eat like 7 times a day!

Since being a fitness instructor requires me to have tons of energy (which I usually always do!) I was looking to make a fun snack that I could have before workouts that was healthy and delicious. Not an easy feat. 

Then I walked into Sam's Club for the second time EVER the other day, first time being when I got my membership a couple weeks ago, and there was a huge bag of energy trail mix starring at me! I knew it was a sign and bought it up, along with 108 rolls of toilet paper and 5 pounds of shredded cheese! Score! I came home and I whipped up these yummy Chocolate Energy Bites!


Now I know they may not be the most attractive things you've ever seen, but I've yet to have someone eat one and not love it! Like my big sister ate one a couple days ago after her workout and she was mad I only brought one for her! Total compliment to me!
To be honest, I'm still a pretty new cook/baker. I learn new things every time I make a different recipe and am constantly messing up. So even though I didn't make these look perfect, they still taste pretty darn perfect!
I'm totally obsessed with these things. They've got my two favorites...chocolate and peanut butter. They give me a great boost before my workouts and are crazy healthy too. They may not have great looks, but they taste amazing, and that's what's important to me!
Ingredients:
1 Cup energy trail mix (mine is pictured below)
1/2 Cup old fashioned oats
1 tsp cinnamon
1 Cup chocolate chips, melted
1/2 Cup peanut butter
1/2 Tbsp vanilla extract


Directions:
Line a baking sheet with wax paper. Make sure the sheet will fit in your freezer. Set aside.

In a medium bowl combine the trail mix and oats. 

Sprinkle the cinnamon over that.

Melt the chocolate chips until smooth, about 1 minute stirring at 30 seconds. 

Right before you add the melted chocolate, drop the peanut butter on the oats and stir the vanilla into the chocolate.

Pour the melted chocolate over the peanut butter and trail mix. Stir until fully combined.

Scoop out balls of the mix using a cookie dough scoop or a spoon and drop them onto the wax paper. 

Let set for about an hour in the freezer until you eat one. I grab one every morning before a workout and they give me that quick boost I'm looking for. Plus they're delicious, so that helps!

Need a scoop? Here's the one I use.
Norpro Stainless Steel Scoop, 1 Tablespoon, 35mm
Norpro Stainless Steel Scoop, 1 Tbsp

Here's the Energy Mix I used.


Planters Nutrition Sustaining Energy Mix-Blueberry Nut

So what do you grab when you're needing a little pick-me-up? Would love to hear any great energy bite recipes you have!

Thanks for stopping by!

**I linked up to simple supper, titus 2 tuesdaycreate it thursdayfull platethursday styleweekend potluckcreativity unleashedweekend bloggy readingbest of the weekend

Time for Turn It Up Tuesday

Hey Y'all! Welcome to another fabulous Turn It Up Tuesday Link Party! I can't wait to see what you have been up to! In case you missed it, here's what's been happening in my kitchen:
And my latest creation!
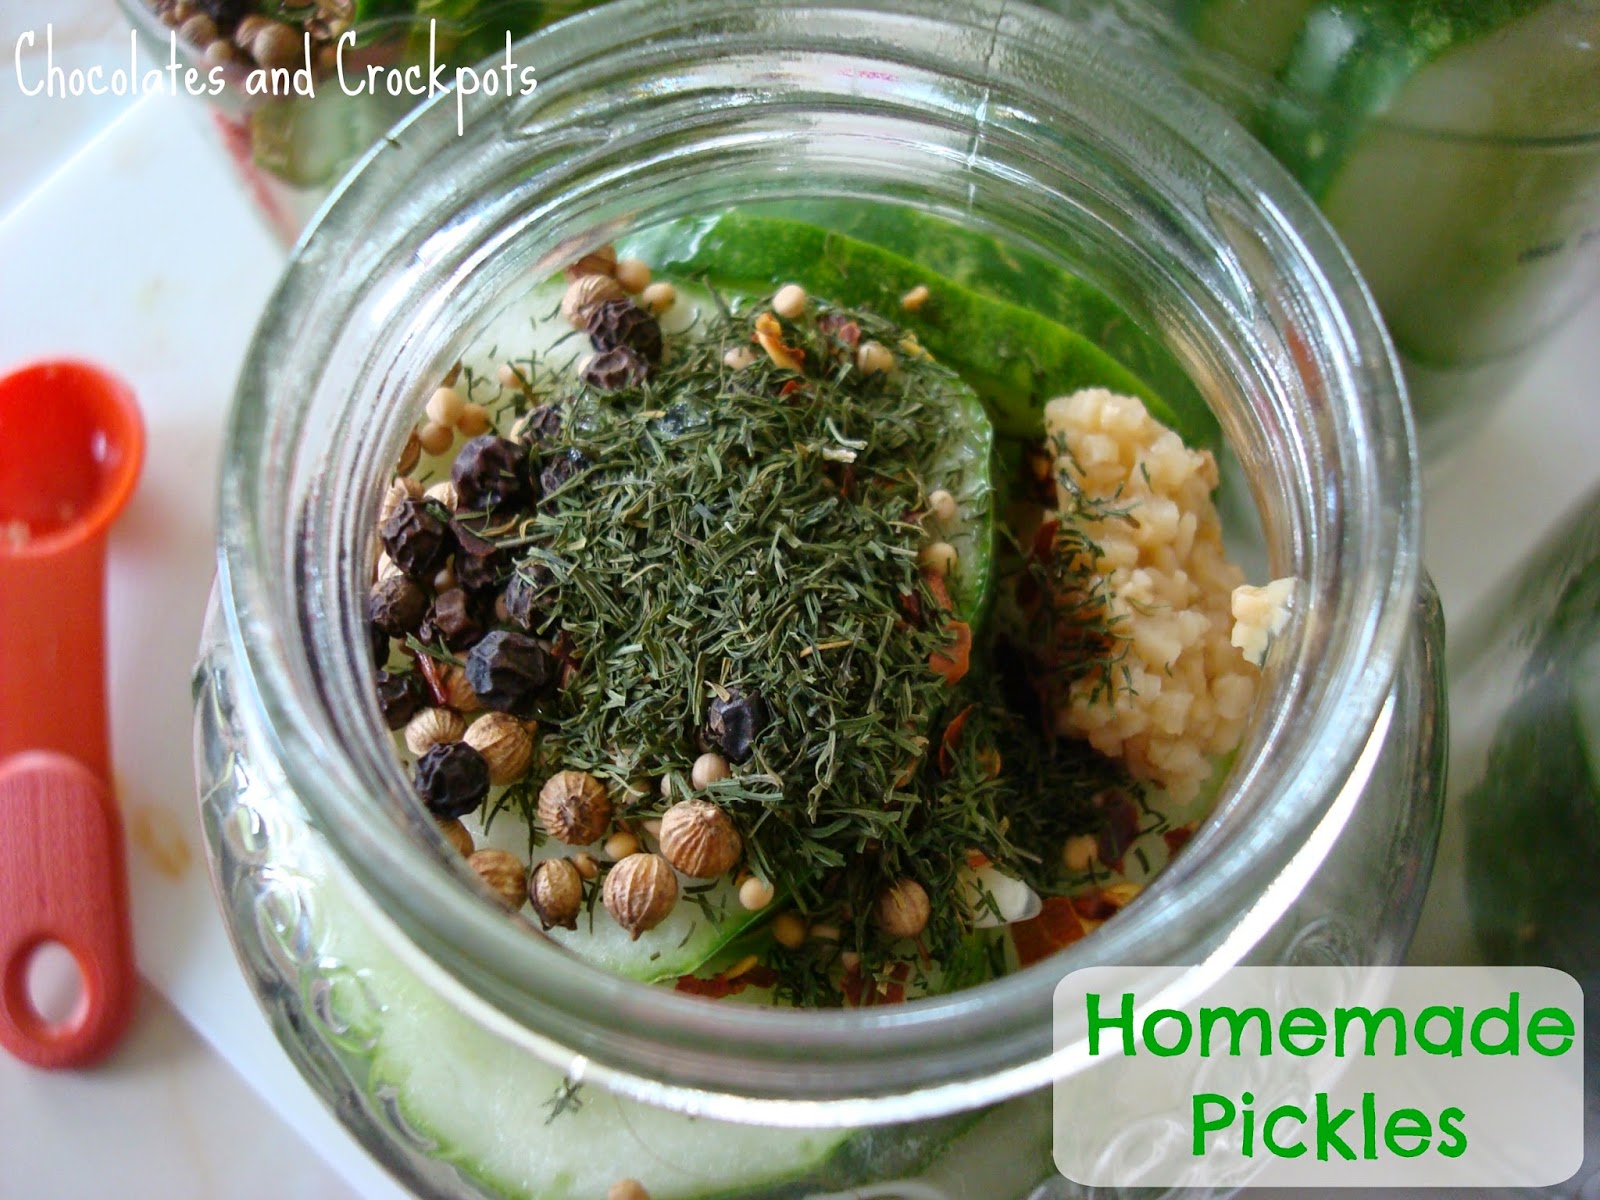
Last week was pickle week in my house, now show me what you were up to!

Welcome to the 49th week of Turn It Up Tuesday!
The Emmys are here! Are you watching it? To celebrate the Emmys, we are going a bit glamorous this week! Do you have any Emmy or celebrity posts? Share it here! How about funny and entertaining posts? Share them here! But, please don't feel limited - share anything you'd like!
Thanks so much to everyone that joins us each week and makes this blog hop the best that it could be!
As you may know, Turn It Up Tuesdays is all about being happy, excited, energetic...and having fun! Link up your favorite posts (old or new) and meet some awesome bloggers in return! Link up your funny stories, DIY posts, recipes, mommy moments -- anything at all, as long as it is family-friendly. We want to laugh, be entertained, be inspired, and have a good time!

SPONSOR OF THE MONTH

Debbie from Heartbeats ~ Soul Stains

Debbie
"Heartbeats Soul Stains is a place I’d like to share my thoughts and experiences on being a woman, wife, a mother of 7, friend and survivor of many different obstacles, challenges and tragedy. I will share the good, the bad and the oh so ugly things that happen in a family our size. Life is hard for all of us, we all have those crosses to carry. Life is also very beautiful and precious and I am determined to never take the amazing blessing I have been given for granted."
Stop by and check out her blog...it's definitely a great read!
Are you interested in having your blog or website featured in this spot? Then, sponsor Turn It Up Tuesday for a month! Click here! It's only $5 for an entire month! We're accepting sponsors for 2015!

Welcome the lovely ladies of Turn It Up Tuesday!

TUT Hosts 8.24.14
(from the top - left to right)
Natasha from Epic Mommy Adventures | Stacey from This Momma's Ramblings | Jessica from The Wondering Brain | Cathy from A Peek Into My Paradise | April from 100lb Countdown | Becka from Probably Craftin | Kae from Where's My Pacifier? | Kelly from Making-More | Rachel from Craving Some Creativity | Cindy from Mom Maven | Kimberly from Keystrokes by Kimberly| Rhonda from Mother 2 Mother | Tara from Anything & Everything | Karen from Quinton Wench | Jillian from Baby Doodah | Chelsea from Mommie and Wee | Tenns from New Mama Diaries

And welcome our awesome guest hosts for August!

TUT Aug 2014 (6)
(from the top - left to right)
Elie from Chocolates and Crockpots | Ce Ce from A Chicago Mom and Color Crush Creative | Sandy from Being Content Where You Are | Trista from A Purpose Driven Wife | Becky from bybmg | Kimberly from Being a Wordsmith | Lauren from Life In The Wilde | Silvie from My Silly Little Gang | Victoria from Giveaways 4 Mom

Interested in being a guest host or becoming a permanent co-host?

Complete the form here! Monthly co-hosts will be chosen on a first come first-serve basis. We're now accepting guest hosts for October, November and December.

Here are the Featured posts from last week!

deal-with-difficult-family-members
Victoria chose How to deal with difficult family members from Snippets of Inspiration. "I chose How to with Difficult Family Members because we all have those family members who can get under our skin. This article is right on point when it comes to how to deal with them without running your blood pressure up in the process."
obstacle-course-Collage2-369x555
Kelly chose obstacle course from Life's Little Projects. "I love fun activities that gets kids moving, especially when it is done frugally at home."
05b
Tara chose Fabric-Covered End of Summer Wreath from Melanie Gets Married. "This bright colors on this wreath really caught my eye when I saw it. I love everything about it, the different prints and bright fun colors really just come together!"
BlogBusinessNextLevel-011-1024x741
Ce Ce chose Taking Your Blog (& Business) To The Next Level from New Mama Diaries. "This is a very inspiring post with great tips on how to improve the quality of your blog!"
20140731_171105
Elie chose Grilled Sweet Peppers Wrapped in Bacon from Home Is Where The Heart Is. "You had me at bacon...and grilled! Two of my favorite things! These will go great with our burgers this weekend!"
afterbaby
Chelsea chose Facts of Life: After Baby from Logan Can... "This post was so incredibly true. I think every mom can relate to what she shared, especially about the date night's! Loved it!"
Write-your-text-here1
Jillian chose How I Organized My Life with this DIY Aqua & Gold Chalkboard Calendar from Making It In The Mountains. "I love her post about making a calendar that she has posted to organize her life. I'm constantly looking for new and exciting ways to organize and this inspired me to find a calendar for the wall in my office. I love it!!"
5a_zps285a6a06
Rachel chose Our Debt-Free Journey {One} from Blessed in Alabama. "I chose this post because it's hard to be honest with ourselves sometimes and I greatly admire anyone who starts this journey. I have bounced back and forth between no debt and manageable debt and I completely understand the hardwork and sacrifice it takes to achieve a debt-free status. Good Luck to Toni and this will be a great journey to read along with!"
4th doctors scarf bracelets
Stacey chose Doctor Who Scarf Bracelets from Sum of Their Stories. "These bracelets are amazing! I have spent this past week re-watching seasons 2 through 7 of Doctor Who, in great anticipation of the new season premiere of the 12th Doctor. I feel that this is a fitting post to choose as a favorite, wishing that I could knit, because I would definitely make these! Thank you so much for sharing!"
Me-to-We
Jessica chose Gratitude vs. Mindfulness from Reflective Mama. "I love her take on concentrating on the "now". Today, I think many of us tend to get super busy with "distractions" such as emails, text messages, etc. whenever we have that "free moment." I think we need to unplug during the day and appreciate the "now" around us like the baby giggles or even taking time to smell the roses. Awesome post and great reminder on living in the now!"
beyonce-mug
Tenns chose Organized: 5 Tips to getting the most out of your day from 180 Days to Happy. "You can never have enough organization tips! I’m always looking for ways to maximize my time and what I do throughout each day. I’ll definitely be keeping this post on handle for how to do it even better!"
latlongsign_pinterest1
Sandy chose Latitude & Longitude {HOME} Wall Art from Home.Made.Interest. "This is my favorite for the week - Using latitude and longitude is such a great way to personalize your home. This would also make a great house warming or bridal shower gift. Being the thrifty gal I am, I love that you found these pieces in a scrap bin. Thank you for the inspiration!"
http://i1.wp.com/mypinterventures.com/wp-content/uploads/2014/08/Updated-Dollar-Store.jpg
Becky chose Fall Dollar Store Craft Contest from My Pinterventures. "I loved this post because it's fantastic idea. So many DIYs consist of things that are expensive. I love a good, cheap, craft and can't wait to see what happens with this link up. I may even give it a whirl!"
strawberry-rolls-5
Silvie chose Mini Strawberry Sweet Rolls with Vanilla Cream Glaze from Born To Bake Forever. "I chose this because I have a weakness for both strawberries and desserts! After trying this recipe I have found another delicious family favorite."
Blog Profile Pic
Kimberly chose How To Create An Awesome Blog Profile Picture from Barbie Bieber and Beyond - Raising Girls. "I have been using the Google+ widget to provide a profile pic on my blog. But I have been wanting to change it up for some time now. This post showed me the perfect way to do so using Canva. The tutorial tells you how to upload the finished product in Blogger, but if you are a WordPress user like me, you can still get it done."
20140808-141024-51024091
Stop by and show some love to our featured bloggers this week! I'm sure they'd all appreciate it!
If you were featured above, feel free to share the badge below with pride on your blog or website!
Epic Mommy Adventures
<div align="center"><a href="http://epicmommyadventures.com" title="Epic Mommy Adventures" target="_blank"><img src="http://epicmommyadventures.com/wp-content/uploads/2014/04/200pxturnitupbuttonfeature1_zps09bd5c75.png" alt="Epic Mommy Adventures" style="border:none;" /></a></div>
 

And the Best of the Best is...

We have two posts that are tied for 1st place, so we'll be selecting 3 winners this week!
deal-with-difficult-family-members
How to deal with difficult family members from Snippets of Inspiration
beyonce-mug
afterbaby
Facts of Life: After Baby from Logan Can...
Show some love to our Best of the Best bloggers this week!!!!
As the Best of the Best, you win free ad space on Epic Mommy Adventures for 30 days! Please showcase the badge below with pride on your blog!
Please send an e-mail to Natasha at 1EpicMommy@gmail.com and she will provide you with all the details!
Epic Mommy Adventures
<div align="center"><a href="http://epicmommyadventures.com" title="Epic Mommy Adventures" target="_blank"><img src="http://epicmommyadventures.com/wp-content/uploads/2014/04/200pxturnitupbuttonbest_zps00692ef1.png" alt="Epic Mommy Adventures" style="border:none;" /></a></div>

So now that you've met our sponsor of the month, our hosts and co-hosts, and the Featured and the Best of the Best...

let's get started!

  • Show some love to your hosts and co-hosts simply by following them on social media and leaving a comment so they can follow you back.
  • Link up as many posts as you'd like! The more, the merrier!
  • Check out some of the other posts and make some new friends!
Grab the button below and showcase on your sidebar! Invite your fellow bloggers to join the fun!
Epic Mommy Adventures
<div align="center"><a href="http://epicmommyadventures.com" title="Epic Mommy Adventures" target="_blank"><img src="http://epicmommyadventures.com/wp-content/uploads/2014/04/200pxturnitup1_zps05216d89.png" alt="Epic Mommy Adventures" style="border:none;" /></a></div>
Link up your posts, make some friends, and earn the chance to be featured or become the Best of the Best on Turn It Up Tuesday! We will feature the favorite posts each week!

Thanks for stopping by!

Saturday, August 23, 2014

Homemade Ranch Dressing

Well isn't this new! Me coming to you on a weekend?! No!? Yes!! I wanted to get this post up yesterday, but sometimes life is just too fun and if I have to choose between posting and having fun...well the latter will always win :)

So what is so importantly awesome that I can't wait until Monday to share with you, you ask?! It's my newest recipe/way to save money! Homemade Ranch Dressing!
My husband said his grandpa would be so proud. I guess he is known for making his own dressings. He simply opens the fridge, pulls out a little of this and a little of that, mixes it up and that's his dressing. I love it! No rules, no real measuring, just throwing together things you like until something you love comes out. That's kinda how this recipe happened.
At first I wasn't measuring anything, but figured you would want some kind of quantitative way to make this with sizes other than "a scoop" and "a dollap" and "a pinchful". 
It was actually really fun to come up with. I knew the basis for ranch and just went from there using my favorite spices. And it just so happened to be a perfect sauce to go with my deep fried pickles I made using my homemade pickles!

Ingredients:
1/2 Cup mayonnaise (I used mayo with olive oil)
1/6-1/3 Cup sour cream
1/4 Cup buttermilk
1 Tbsp parsley
1/2 Tbsp white vinegar
1/2 tsp garlic powder
1/4 tsp dill
1/4 tsp pepper
1/4 tsp salt
*1 Tbsp Parmesan cheese (totally optional!)

Directions:
Mix everything together until its smooth. You can start out using half the sour cream and mix it all together. If you want it to be less thick, add the rest. Taste it as you go to make sure it's to your liking.

*Omit the cheese if you aren't a fan. I love cheese and could add it to almost anything!

Pour into a glass jar or bottle you have and write the date on the lid with a piece of tape. 

It should last at four-six months in the fridge. This recipe makes about a cup of dressing. If you need more, just double everything.

I must warn you this is a tad on the garlic side. If you aren't a garlic freak like my husband and I, try only using 1/4 tsp garlic powder. 

Need some jars? Ball Jars are great to have!
Ball Mason Jars Wide-Mouth Can or Freeze -  16 oz 12pk
12 16oz Ball Mason Jars

So are you the same way with your dressings? Do you just open the door and grab whatever sounds good? Feel free to share your favorite homemade dressing recipe with me. I'm looking for a good Italian!

Thanks for stopping by!

**I linked up to amaze me monday, frugal crafty home, much ado about mondaysimple suppertitus 2 tuesdaycreate it thursdayfull platethursday styleweekend potluckcreativity unleashedweekend bloggy readingbest of the weekend

Wednesday, August 20, 2014

Homemade Deep Fried Pickles

Hey Y'all! I hope you're having a wonderful Wednesday! I am so happy we finally got some rain around here. My garden was in some desperate need of a good soak. My cucumbers are still going strong and the recipes just keep coming!

Today I'm sharing a recipe that takes me back to my college years. I worked at this restaurant in Bloomington (Go Hoosiers!) that served Deep Fried Pickles. 
People loved them! They would eat them like crazy and would gush about how awesome they were. I personally was like...pickles...ugh...gross. Yuck! Like you're a total weirdo for just sitting there eating them right out of the jar. Looking back now I realize I was the weirdo! Pickles are amazing!

So is this recipe. It's quick and easy and delicious. I started by mixing together some of my favorite yummy seasonings.
Then I added some water and some pickles.
Threw the slices in a pan full of hot oil (no picture because, well I need both hands when I fry stuff). Let them cool, and devour them!
I could have ate these babies like potato chips! They were soo good. Plus I whipped up some homemade ranch, a recipe I'll be sharing later this week, and that put these over the moon amazing! I can't believe I went all those years of depriving myself of pickles. What was I thinking?!?

Ingredients:

2 Cups pickles
1 Cup flour
1 Cup water
1 Tbsp Lawrys seasoned salt
1 tsp Italian seasoning
1/2 tsp salt
1/2 tsp cayenne pepper
1/4 tsp dill weed

Vegetable Oil for frying

Directions:
Heat a pan with about an inch of oil in it to 375 degrees, about medium high

While pan is heating up, combine the flour, seasoned salt, Italian seasoning, salt, cayenne pepper, and dill in a medium bowl.

Add the water and stir until it becomes smooth.

Stir in 1 cup of pickles until coated. Using a slotted spoon scoop the pickles a few at a time from the bowl to the pan, allowing the excess to drip off before going in. Let them fry for about 2 minutes then flip them. 

After about 2 more minutes remove the pickles and allow them to cool on paper towels. Sprinkle with more salt (optional).

Let the oil heat back up to about 375 before repeating with the remaining pickles and batter.

Plate em up and serve them with your favorite dip!

I actually just ordered this deep fryer and will let you know how it works out once it arrives. I'm thinking...deep fried oreos!!
Presto 05442 CoolDaddy Cool-touch Deep Fryer - Black
Presto Cool-Touch Deep Fryer

So what foods take you back to your Alma Mater? These pickles, hot dogs with cheese, and Mother Bears pizza really remind me of college and my roommates! Come back soon for my homemade ranch dressing!

Thanks for stopping by!

**I linked up to full plate, thursday style, weekend potluckamaze me mondayfrugal crafty homemuch ado about mondaysimple suppertitus 2 tuesday

Monday, August 18, 2014

Homemade Pickles

Hey Hey Y'all! Hope you had an amazing Monday! Mine was full of laundry, cleaning and baking. This week I'm actually going to be doing a few posts based on the cucumber! Why the cucumber you ask? Because I built my first garden this year and I have cucumbers coming out of my ears! And they come in every shape and size you can imagine. Just one vine has produced over eight cuckes! 
I seriously didn't think those tiny little plants I started back in April could produce so much, but boy was I wrong. I've already given away about a dozen and have another dozen of my own I've been using in various meals. Since I had such an abundance, I decided to try my hand at making my own Homemade Pickles!
I found a ton of recipes online and was given a few family recipes to try. It was kind of overwhelming. So I decided to pick the ingredients I liked and use those! Ignore the vinegar in the background, it didn't make the cut :)
Speaking of cut, one of the most important parts of this recipe for me is knife safety. I recently had a friend over and while washing a knife she sliced her finger pretty bad. Like she should've had stitches bad. So, when slicing up these green babies make sure to hide your fingertips. Here's what I mean:
Curl in your tips just in case the knife slips. Once you get all your slices done, stack them in your jars.
Next, sprinkle in the good stuff!
Then pour in salted water and top the jars with a "weight". What I mean by this is put something on top to keep all the slices submerged in the water. I took a big chunk of a green pepper (also from my garden :) and put that on top...like this.
That helped keep all the slices fully immersed in the water. Let them sit out for about three days. 
On the third day, take out the green pepper and try a slice. If they're to your texture liking, throw away the pepper (or eat it) and place the jars in the fridge. If you see some "scum" on the top, like foamy white stuff, don't panic. Just use a spoon and scoop it out. Replace the lid and keep them in the fridge. If they aren't ready, keep them on the counter and keep trying each day until you reach your desired taste and crunch. Try not to exceed five or six days though. 
Ingredients:
Cucumbers
2 Cloves minced garlic
1/2 tsp dill weed
1/2 tsp coriander seeds
1/4 tsp mustard seeds
1/4 tsp whole black peppercorn
1/4 tsp red pepper flakes

2 Cups water
1 Tbsp salt

Directions:
Slice up your cucumbers how you like them. I did thin slices, but you could also do quarters.

Stuff all the slices in a jar until it's packed. Top each jar with the seasonings listed above. Meaning each jar gets 2 cloves of garlic, 1/2 tsp dill, etc.

Combine the two cups of water and salt and stir until the salt is completely dissolved. Pour the water over a jar. Repeat for each jar.

Using a big slice of a green pepper, or an onion chunk if you want, place it on top of the slices to keep all the cucumbers under the water. 

Secure the lid and turn the jar upside down a couple times so that the seasonings can get fully incorporated in the jar.

Place the jars on your counter and allow to sit for three days. If you see a white skin form at the top, scoop it out with a spoon and replace the lid. 

At the end of the third day test the pickles to see if they're to your liking. If not, allow to sit another day. When they're ready, place them in the fridge. This will stop the fermentation process. 

Eat with sandwiches, salads, or just a fork :)

I used old Prego jars, but feel free to use any kind of jar you like. I didn't really sanitize the lids or jars beforehand, besides running them through the dishwasher when I originally saved them. 

These should keep in the fridge for at least six months. Let me know if you have any questions! Enjoy!

Thanks for stopping by!

**I linked up to full platethursday styleweekend potluckamaze me mondayfrugal crafty homemuch ado about monday